Code-signing Windows executables using Authenticode 2: Extended validation certificates

By the end of the last post, we’d managed to sign our application installer with a DigiCert standard code signing certificate using signtool in Windows, but were still being presented with the following dialog: SmartScreen Application Reputation warning after signingThis was an improvement over the red bar that we’d seen when downloading the unsigned version of the same installer, but the text is still quite daunting for the user. On the basis of a 2011 MSDN article on Authenticode code signing, we then ordered an Extended Validation (EV) certificate from DigiCert in the hope that it would remove the warning entirely when downloading the installer. Specifically, the article notes that:

In August 2012, Microsoft announced support for a new type of Code-Signing certificate, the Extended Validation (EV) certificate. These certificates tend to be more expensive and harder-to-use (requiring security token hardware) but have the benefit of providing faster accumulation of reputation for SmartScreen.

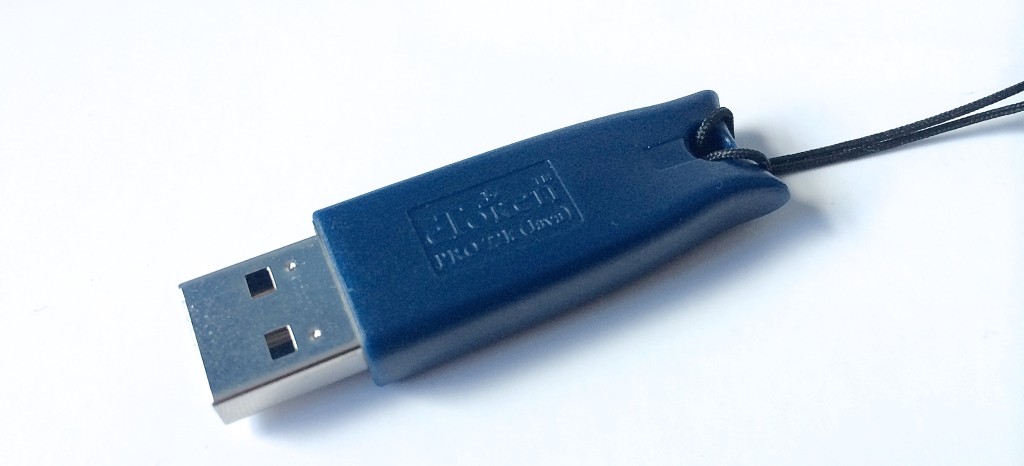
I will point out at this juncture that DigiCert customer service were excellent throughout. We notified them as soon as we realised the standard certificate wasn’t going to meet our needs and they immediately credited our DigiCert account with $223 (for the standard certificate) and didn’t revoke the original certificate until we’d received and activated the hardware token that’s required for EV signing. The EV hardware token, including expedited international shipping was $474 (so an extra $251 over the standard certificate) and arrived within 2 working days of ordering. Incidentally, the hardware token from DigiCert was an eToken PRO 72k (Java) from SafeNet Inc: IMG_9872It’s also probably worth noting that we’d read a couple of accounts of having serious problems getting the hardware token to work with Windows running inside a virtual machine. Maybe we were just lucky, but we managed to sign the executable in Windows 7 running inside a VMWare Fusion VM on a MacBook Pro running OS X Mavericks with no issues whatsoever. Without further ado, here’s the procedure for signing a Windows executable using the EV hardware token:
1. Obtain the default token password and install the drivers

On receipt of the hardware token, DigiCert directs you to your online account where you can confirm receipt of the eToken and obtain the factory default password. Note that you are only shown this password once so be sure to record it somewhere. Once you’ve noted down the password, the DigiCert site instructs you to download the SafeNet Authentication Client for Windows. At the time of writing, this was at version 8.2 and weighed in at 49 Mb. A standard installation (as opposed to a BSec-compatible installation, which includes legacy iKey support) adds the SafeNet Authentication Client Tools to the Start menu.

With the SafeNet Authentication Client installed, plug the hardware token into an available USB port. As a brief aside, the token identifies itself as a composite USB device (Class 0) with a VendorID of 0x0529 (Aladdin Knowledge Systems) and a ProductID of 0x0620. The main interface of the composite device is Class 11: Integrated Circuit Card Interface Device (CCID). Typically, Class 11 devices have a slot for a smart card (or Integrated Circuit Card in USB parlance), but in the case of the hardware EV token, the card is effectively integrated into the device, as indicated by the “00000000” in the dwMechanical field of the USB device descriptor:

dwMechanical bitwise operand Meaning
00000000h No special characteristics
00000001h Card accept mechanism
00000002h Card ejection mechanism
00000004h Card capture mechanism
00000008h Card lock/unlock mechanism

2. Change the default token password

With the hardware token plugged in, select the “Change Token Password” option from the main menu of the SafeNet Authentication Client, enter the factory default password in the “Current Token Password” field and enter and confirm a new password of your choosing in the “New Token Password” and “Confirm Password” fields. The token we received had hard-coded password requirements of between 8 and 16 characters and a “complexity requirement” of at least three different character types (of the four possible: numerals, lowercase characters, uppercase characters and special characters).

3. Sign the installer or executable

Once you’ve changed the token password, leave the token plugged in and open the Windows certificate manager by pressing Windows-R, typing certmgr.msc and pressing enter. The certificate on the hardware token should appear under Certificates – Current User > Personal > Certificates:
Windows certificate managerMake a note of the exact text that appears in the “Issued To” column.

Unless it’s already on your PATH, open a prompt and navigate to the directory containing your version of signtool (by default, this is C:\Program Files\Microsoft SDKs\Windows\v7.1\Bin with version 7.1 of the Windows SDK) and invoke signtool with the following options:

>signtool sign
/t http://timestamp.digicert.com
/n "Exact text from the Issued To column" "C:\path\to\the\executable\you\want\to\sign.exe"

The SafeNet Authentication Client should then present a dialog asking for the hardware token password set in step 2 and, assuming the correct password is provided, you should then see the following text in the command prompt:

Done Adding Additional Store
Successfully signed and timestamped: C:\path\to\the\executable\you\want\to\sign.exe

And that’s it! The signature can be verified, as with the standard certificate, by selecting the executable in Windows Explorer, selecting File > Properties and switching to the Digital Signatures tab, under which the timestamped signature should be listed.

Conclusion

The outcome with the EV certificate-signed installer is much more user friendly than with the standard certificate:IE download prompt with EV certificateClicking “Run” results in the download starting, the text being replaced with “Running security scan” and the installer running immediately on the user’s computer. Success!
Class 0 SMS messages

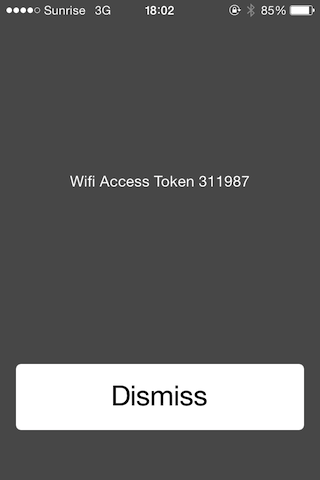
Yesterday, I received a Wi-Fi password by means of a class 0 or “flash” SMS message. In iOS 7, class 0 messages are presented as a grey, full-screen overlay that includes the horizontally- and vertically-centered message text and a single “Dismiss” button:
Class 0 SMS
As per the SMS specification, after pressing “Dismiss”, the overlay and message disappear and the message is immediately discarded, leaving no trace of its delivery on the phone (rather like a text-only antecedent to Snapchat). Before exploring the portions of the SMS specification that deal with class 0 messages, there are a lot of abbreviations that the 3GPP standards group like to use:

Abbreviation Full phrase Definition
ME Mobile Equipment Synonymous with mobile station
MO Mobile Originated Denotes the capability of the GSM/UMTS system to transfer a short message submitted by the MS to one SME via an SC
MS Mobile Station The mobile station to which an MT short message is destined or from which an MO short message is sourced. Synonymous with the term “user equipment” (UE) in UMTS terminology
MT Mobile Terminated Denotes the capability of the GSM/UMTS system to transfer a short message submitted from the SC to one MS
SC Service Center Function responsible for the relaying and store and forwarding of a short message between an SME and an MS
SM Short Message Information that may be conveyed by means of the Short Message Service
SME Short Message Entity Entity which may send or receive Short Messages
(T)PDU (Transfer) Protocol Data Unit A unit of data specified in a protocol of a given layer
(U)SIM (Universal) Subscriber Identity Module Integrated circuit that securely stores the international mobile subscriber identity

With all those laid out, the specification defines a class 0 SMS message as follows:

When a mobile terminated message is class 0 and the MS has the capability of displaying short messages, the MS shall display the message immediately and send an acknowledgement to the SC when the message has successfully reached the MS irrespective of whether there is memory available in the (U)SIM or ME. The message shall not be automatically stored in the (U)SIM or ME.

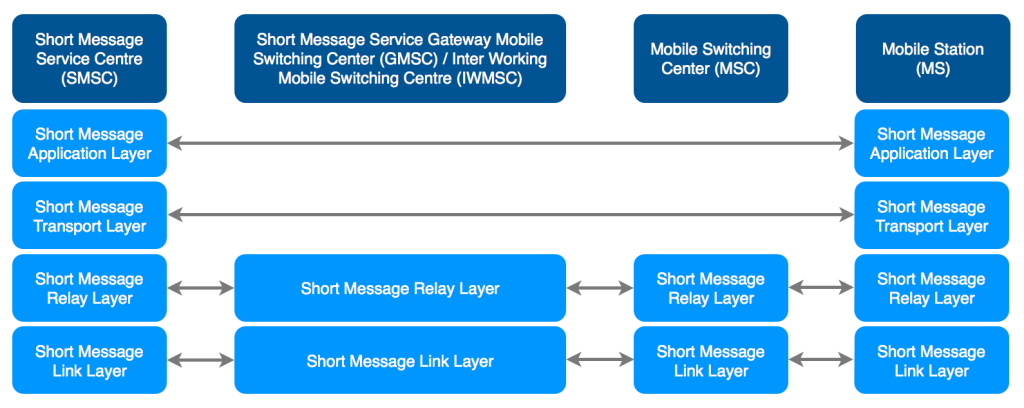
But where in the various levels of the SMS protocol is a message defined as belonging to a particular class? The SMS protocol stack consists of the following four layers, which interact as depicted in the figure:

  • Short Message Application Layer (SM-AL)
  • Short Message Transport Layer (SM-TL)
  • Short Message Relay Layer (SM-RL)
  • Short Message Link Layer (SM-LL)

SMS protocol stack

It is the Short Message Transfer Layer (SM-TL) that defines the class of the message. The SM-TL sits immediately below the Short Message Application Layer (SM-AL), allowing the SM-AL to send and receive messages and receive reports about previously sent messages. The SM-TL defines the following six protocol data units (PDUs):

  • SMS DELIVER for conveying a short message from the SC to the MS
  • SMS DELIVER REPORT for conveying:
    1. a failure cause (if necessary)
    2. information as part of a positive or negative acknowledgement to an SMS-DELIVER or SMS-STATUS-REPORT
  • SMS SUBMIT for conveying a short message from the MS to the SC
  • SMS SUBMIT REPORT for conveying:
    1. a failure cause (if necessary)
    2. information as part of a positive or negative acknowledgement to an SMS-SUBMIT or SMS-COMMAND
  • SMS STATUS REPORT for conveying a status report from the SC to the MS
  • SMS COMMAND for conveying a command from the MS to the SC

Since we’re interested in how to send class 0 messages, it’s primarily the SMS-SUBMIT and SMS-DELIVER PDUs that are of interest here. The SMS-SUBMIT PDU has the following basic elements:

Data types: I, Integer; b, bit; 2b, 2 bits; o, Octet; 7o, 7 octets; 2-12o, 2-12 octets.
*Dependent on the TP Data Coding Scheme.
Abbr. Reference Mandatory Data type Description
MTI Message Type Indicator Yes 2b Parameter describing the message type.
RD Reject Duplicates Yes b Parameter indicating whether or not the service centre shall accept an SMS SUBMIT for a short message still held in the service centre which has the same message reference and destination address as a previously submitted short message from the same originating address
VPF Validity Period Format Yes 2b Parameter indicating whether or not the VP field is present.
RP Reply Path Yes b Parameter indicating the request for reply path.
UDHI User Data Header Indicator No b Parameter indicating that the user data field contains a header.
SRR Status Report Request No b Parameter indicating if the MS is requesting a status report.
MR Message Reference Yes I Parameter identifying the SMS SUBMIT.
DA Destination Address Yes 2-12o Address of the destination SME.
PID Protocol Identifier Yes o Parameter identifying the above layer protocol, if any.
DCS Data Coding Scheme Yes o Parameter identifying the coding scheme within the TP User Data.
VP Validity Period No o/7o Parameter identifying the time from where the message is no longer valid.
UDL User Data Length Yes I Parameter indicating the length of the UD field to follow.
UD User Data No *

Assigning a class to the short message is achieved using the Data Coding Scheme field, which serves two purposes: specifying the data coding scheme of the UD field, and indicating a message class. The DCS field is a single octet, the use of which varies depending on the value of bits 4-7. A message class can be specified in the cases where bits 4-7 are set to 00xx or 1111. In the former case, bit 5 indicates whether or not the text is compressed, bit 4 indicates whether a message class has been specified, bits 2 and 3 indicate the character set and bits 0 and 1 specify the class (if bit 4 is equal to 1). So, for instance, 00010000 (0x10) would indicate an uncompressed class 0 message using the GSM 7 bit default alphabet and 00110100 (0x34) would represent a compressed class 0 message with an 8 bit-encoded UD field. A standard class 1 message would only differ in having the final bit (bit 0) set to 1. So there we have our answer.

As a brief adjunct, the SMS specification also makes provision for type 0 short messages, as distinct from class 0. Type 0 short messages are defined as follows (emphasis added):

A short message type 0 indicates that the ME must acknowledge receipt of the short message but shall discard its contents. This means that:

  • the MS shall be able to receive the type 0 short message irrespective of whether there is memory available in the (U)SIM or ME or not
  • the MS shall not indicate the receipt of the type 0 short message to the user
  • the short message shall neither be stored in the (U)SIM nor ME

The key difference is the device doesn’t notify the user that the message has arrived at all. In his 2005 book, Mobile Messaging Technologies and Services, Le Bodic noted that these messages are used “to page a mobile to check if the mobile is active without the user being aware that the mobile station has been paged.” It seems that type 0 messages are therefore quite popular with surveillance agencies. (Link in German; translation here.)

In terms of assigning a type to the SMS, the pertinent field in the PDU is the Protocol Identifier, which consists of a single octet for the purpose of either referring to the higher layer protocol being used, or indicating interworking with a certain type of telematic device (such as telex or paging systems). In the SMS-DELIVER PDU, when the value of bit 5 in the octet is set to 0, bits 0-4 identify the SM-AL protocol in use between the SME and the MS, which defines the message type. A value of “00000” here indicates a type 0 message. Since bit 6 must be 1 in order to toggle examination of the first five bits, the type 0 Protocol Identifier is simply 01000000 (0x40).

Sum every nth row of a dynamic range in Excel

For a work project, I recently found the need to sum every nth row in a variable-sized range in Excel. Here’s a simplified example worksheet to illustrate the use case:Example
Here we see three company financial metrics over a four-year period with sums of two of the metrics at the bottom. It’s likely that the number of years in the sheet will grow over time and possible that additional metrics could be added in the future. I’ve generically referred to each metric as a “property” and each year as an “item” to which those properties pertain.

The mechanics of summing the cells are conceptually straightforward: it’s the product of an array containing every value in the range and an array that bears some resemblance to a bit mask, in which every nth value is 1 and every other value is 0 (a cellmask, perhaps?). That second array can be calculated using the MOD and ROW functions:

--(MOD(ROW(OFFSET(firstCellInRange,0,0,items*properties,1))-ROW(C1),properties)=0)

In this case, C1 is the first value in the range (as in the screenshot above) and has been entered as a straightforward cell reference to allow the formula to be dragged down to sum each property. Note that the double minus casts an array of boolean values to the corresponding numeric values 0 or 1. According to an MSDN article on optimizing performance in Excel 2010, it’s slightly fast than the equivalent +0 or *1 typecasting approaches.

The bitmask-like array then simply needs to be multiplied with the values themselves using your preferred array multiplication approach:

=SUMPRODUCT(--(MOD(ROW(OFFSET(firstCellInRange,0,0,items*properties,1))-ROW(C1),properties)=0), OFFSET(firstCellInRange,0,0,items*properties,1))
{=SUM1--(MOD(ROW(OFFSET($C$1,0,0,items*properties,1-ROW(C1),properties)=0)) * OFFSET($C$1,0,0,items*properties,1))}

Performance-wise, SUMPRODUCT is typically faster than array formulas, but your mileage may vary.

References

References
1 --(MOD(ROW(OFFSET($C$1,0,0,items*properties,1