Why use access control lists?
Access Control Lists (ACLs) were devised to replace the traditional POSIX permissions system which, by comparison, is fairly limited. The traditional POSIX system uses only 9 bits of data per file system object to define permissions (excluding the sticky bit and the set UID and set GID bits). The system is such that each file system object has three sets (technically classes) of permissions, applying to the 1) file’s owner, 2) the file’s owning group and 3) “everyone else” (by convention, the permissions are always displayed in that order). For each of these permission sets, the ability to read, write and/or execute may be set.
For example, a file with permissions rw−r−−r−− can be read and written by the owner (rw−), but only read by everyone else (r−−), whereas a file with permissions rwxr−x−−− can be read, written and executed by the owner (rwx), read and executed by other group members (r−x), but not accessed at all by other users (−−−). Such permissions are often expressed in 3 digit octal values where each digit represents a permission set (owner, group and other, in that order) and the number is calculated by adding 4 if the read bit is set, 2 if the write bit is set and 1 if the execute bit is set. So, for example, rwxr-xr-x would be represented by 755 in octal (4+2+1, 4+1, 4+1) and rwxr−−−−− would be represented by 740 in octal (4+2+1, 4, 0). More information on how POSIX permissions are implemented on OS X can be found here and here.
This system has been in place for many years on UNIX and is, considering its simplicity, quite powerful. However, in many situations, “workarounds” are necessary to achieve the desired result. For example, although a user can belong to more than one group (see the id command, specifically, id -Gn [username]), a file may only have one owner and one group assigned to it. Therefore, in the situation where two (or more) groups require access to a file, a new “quasi-group” must be created containing all members from both groups, and ownership of the file must be transferred to the new group using chgrp quasigroup foo.bar. This is clearly less than ideal as the new group doesn’t (necessarily) reflect an actual organisational unit, which is what the group attribute was originally designed to do. ACLs were introduced in order to overcome such limitations as well as provide much finer-grained control over file and directory permissions.
What are access control lists?
Apple implemented kernel-level support for ACLs in Mac OS X 10.4 “Tiger” to supplement the POSIX permission system. Apple’s implementation of ACLs is compatible with IEEE POSIX.1e draft 17 (2.0 MB gzipped PDF) which, despite being withdrawn by the IEEE, has been widely implemented and, although not an official standard, ACLs implemented to this draft standard are commonly referred to as “POSIX ACLs.” Apple’s ACL implementation is also compatible with that in Windows Server 2003 and Windows XP. However, not all file systems supported by Mac OS X support ACLs; only HFS+ supports them locally, while AFP and SMB/CIFS support ACLs over the network.
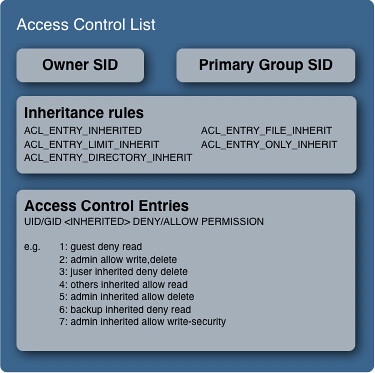
An ACL (which is always associated with a file system object by means of an extended attribute in HFS+) consists of a list of permissions in the form of so-called access control entries (ACEs). In turn, an ACE contains a set of permissions, whether those permissions are allowed or denied, the ID of the “trustee” to which the these permissions apply and rules of inheritance for the permissions. A trustee in this context may be either a user or a group. Note that under the ACL permission scheme, its possible for a group to be the owner of a file — a feat that is not possible under the POSIX system. Also, POSIX makes no provision for inheritance of permissions. While possible to recursively apply permissions to all subdirectories and enclosed items, it is, in Apple’s words, a “one-time operation”, i.e. any newly created files or folders in that file system branch would be created with the default permissions. Here’s a (simplified) view of exactly what’s contained in an ACL:

The granularity of control over file access is considerably greater with ACLs than with the POSIX system, as the following table of ACL access rights demonstrates (courtesy of the chmod man page and sys/acl.h):
| Bit name |
Description |
| All file system objects: |
| delete (ACL_DELETE) |
Delete the item. Deletion may be granted by either this permission on an object or the delete_child right on the containing directory. |
| readattr (ACL_READ_ATTRIBUTES) |
Read an objects basic attributes. This is implicitly granted if the object can be looked up and not explicitly denied. |
| writeattr (ACL_WRITE_ATTRIBUTES) |
Write an object’s basic attributes. |
| readextattr (ACL_READ_EXTATTRIBUTES) |
Read extended attributes. |
| writeextattr (ACL_WRITE_EXTATTRIBUTES) |
Write extended attributes. |
| readsecurity (ACL_READ_SECURITY) |
Read an object’s extended security information (ACL). |
| writesecurity (ACL_WRITE_SECURITY) |
Write an object’s security information (ownership, mode, ACL). |
| chown (ACL_CHANGE_OWNER) |
Change an object’s ownership. |
| Directories only: |
| list (ACL_LIST_DIRECTORY) |
List entries. |
| search (ACL_SEARCH) |
Look up files by name. |
| add_file (ACL_ADD_FILE) |
Add a file. |
| add_subdirectory (ACL_ADD_SUBDIRECTORY) |
Add a subdirectory. |
| delete_child (ACL_DELETE_CHILD) |
Delete a contained object. See the file delete permission above. |
| Non-directory file system objects only: |
| read (ACL_READ_DATA) |
Open for reading. |
| write (ACL_WRITE_DATA) |
Open for writing. |
| append (ACL_APPEND_DATA) |
Open for writing, but in a fashion that only allows writes into areas of the file not previously written. |
| execute (ACL_EXECUTE) |
Execute the file as a script or program. |
Activating and using access control lists on Mac OS X
It’s worth noting at this point that ACLs are in fact switched off by default in Mac OS X. In order to enable them, the fsaclctl program must be used as follows: sudo fsaclctl -p /mountpoint -e, obviously substituting in the appropriate mount point of the volume of interest. ACLs can be activated on all relevant volumes by issuing the command $sudo fsaclctl -a -e and similarly disabled by $sudo fsaclctl -a -d. Finally, the ACL status of a disk can be obtained by simply running sudo fsaclctl -p /mountpoint.
If ACLs have been enabled on the startup volume, a reboot (sudo shutdown -r now) of the system is required such that the change is registered by all applications. If the volume is not the startup disk, simply remounting the file system will suffice.
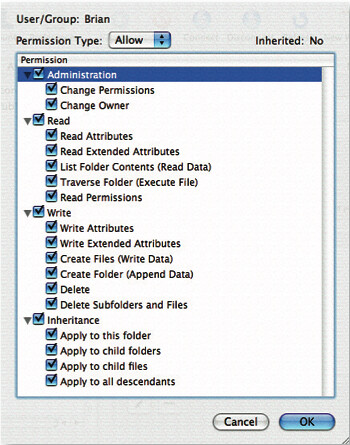
Once ACLs are activated, the tools used to read and modify them vary between the client and server versions of Mac OS X. On Mac OS X client (as of 10.4.8), there is no graphical interface for manipulating ACLs anywhere to be found and, as such, reading and writing permissions to ACLs must be accomplished through the command line programs ls and chmod, respectively. In Mac OS X Server, the Workgroup manager has been updated to include a rather nifty GUI for viewing or altering ACLs:

I think the GUI’s fairly self-explanatory, but what about on Mac OS X client? ls supports printing of all ACEs associated with a file by specifying the -e flag, which must be used in conjunction with the -l in order to see the list of ACEs. Actually setting and changing ACLs is a little more complicated (although not greatly so) and makes use of the chmod command, which is the tool originally designed for changing standard POSIX permissions. chmod‘s options for dealing with ACLs are: +a(#), -a, =a#, -E, -C, -i and -I. Here’s an example using chmod and ls -le to make a directory unsearchable to the “username” user:
$ mkdir nosearch
$ echo “Hello world” > nosearch/hideandseek.txt
$ ls -le
drwxr-xr-x 2 username group 68 Jan 12 14:28 nosearch
$ mdfind hideandseek.txt
/nosearch/hideandseek.txt
$ chmod +a “username deny search” nosearch
$ ls -le
$ drwxr-xr-x + 3 username group 102 Jan 12 14:36 nosearch
0: user:username deny search
$ mdfind hideandseek.txt
$
The most important command here is $ chmod +a “username deny search” nosearch, which shows the general syntax that must be used with chmod. Logically enough, to remove the same permission, one would have to type $ chmod –a “username deny search” nosearch (notice the minus rather than plus before the a.) Access control entries can also be inserted at a specified point in the list by using the +a# flag thus: $ chmod +a# 2 “others deny read” filename to insert the others deny read ACE at position 2 in the ACL. Ordering ACLs isn’t crucial, but the canonical order is something along these lines: user deny, user allow, group deny and group allow. The man pages for ls and chmod have very detailed information on all of the options available in each tool.
One glaring question remains — how do access control lists and POSIX permissions work in an interoperable fashion on OS X? Basically, if ACLs are active on the file system hosting the requested file, OS X will look for the existence of an ACL for that file. If an ACL is found, the kernel evaluates it ACE by ACE until the requested permission is either allowed or denied. If the requested permission is neither allowed or denied or if an ACL is not found, the system falls back to the POSIX permissions system and evaluates those. A very thorough description of permission evaluation on OS X can be found here.
Summary
With the introduction of access control lists, Apple was really playing catch-up with other operating system vendors (notably Microsoft). But catch-up they certainly did – the ACL implementation on OS X is very thorough and, as Apple says, is “not bolted-on” but rather integrated from kernel level upwards, as one would hope. Although there is still no graphical interface for managing ACLs on OS X client, the need for ACLs on a single- (or few-) user system is considerably smaller than on a server and the addition of a UI would probably only add unnecessary confusion to the client OS. The importance of the introduction on OS X Server, however, cannot be underestimated even if only for the fact that OS groups and users may finally represent the actual organisation of groups and users in real life. This, along with the removal of the POSIX 16-group membership limit, the ability for permissions to be automatically inherited and the much finer-grained access control makes ACLs an extremely attractive option for system administrators.

