TextWrangler

Since I’ve been doing a lot (OK, 400 lines) of Perl scripting this week, I’ve spent quite a lot of time in TextWrangler from Bare Bones Software. I do have a license for TextMate (from MacHeist) and have used it a little in the past, but I’d heard that TextWrangler had built-in FTP/SFTP support this week and, since it’s free, I thought I’d give a go.

Mac OS X users are spoilt for choice when it comes to graphical text editors. We’ve got TextMate, skEdit, SubEthaEdit, TextWrangler, BBEdit, Smultron, the new kid on the block Coda and many others. And, of course, there’s always Apple’s offerings of TextEdit for simple text-editing and XCode for (mainly) Carbon and Cocoa apps.

Of all these apps (aside from Apple’s own), only TextWrangler and Smultron are free, while the others cost between $25 and $125. Being a student on a tight budget, I’m always looking out for a bargain, so TextWrangler seemed like an obvious place to start.

TextWrangler

For those of you who used BBEdit Lite and thought it was a bit underpowered, do not be put off TextWrangler — it’s considerably more powerful. It has support for SFTP/FTP (including bookmarking), syntax colouring and function navigation for over 20 languages (with per-language settings), completely customisable keyboard shortcuts, file bookmarks, tabs (of the draw variety), grep-powered text searching (with PCRE 5.0 support), multiple clipboards… the list goes on.

For me, these features have made TextWrangler a joy to use. The ability to just Cmd-S, switch to my SSH session in Terminal and run the freshly uploaded script immediately is brilliant. The syntax highlighting makes code considerably easier to read and the text searching is as powerful as your knowledge of regular expressions. The Text menu is particularly feature-packed with the likes of “Prefix/Suffix Lines…” and “Process Lines Containing…”, allowing extraction of regexp-matched lines to the clipboard or a new file. The “#!” menu is great as well, containing useful “Check Syntax”, “Run in Terminal” and “Run in Debugger” commands for local development.

While I’ll probably give TextMate a try again in the coming weeks (mostly for its excellent “snippet” support), for the moment I’m extremely happy Wrangling my Text.

Wrestling with OO

Until a week ago, I had never programmed in Objective-C or used any of Apple’s frameworks, APIs, “Kits” or otherwise. Furthermore, I had never done any object-oriented programming (OOP to its friends) or used XCode to any great extent. My only “real” programming experience was in Pascal (through Delphi) on Windows, a little bit of ANSI C and bits of Applescript, PHP and Python scripting for various purposes. This inexperience meant that I’d also never dealt with memory management thanks to either garbage collection or the simplicity of the programs I was writing. Now, however, I’ve written a Mac OS X native “Cocoa” program that does this:
My first program
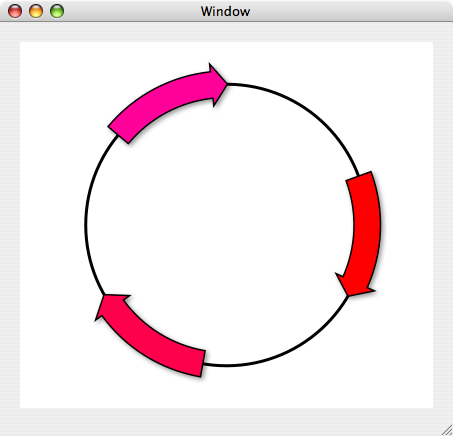
Brilliant. It even resizes smoothly. But why and how did I do this and does it actually do anything useful?

Why?

I thought it would be a good idea to write a program to help me map out plasmids for my (limited) studies in biochemistry. Plasmids (as you may have just discovered from Wikipedia) are circular pieces of DNA, which are frequently used in molecular biology to insert genes into bacteria to, for example, overexpress a gene for protein purification or amplify a DNA sequence for further cloning. Knowing what genes, promoter sequences, restriction sites and other mysterious bits are in your plasmids is very important. So, I thought, I’ll finally get to grips with Cocoa and Objective-C and write a program to manage a library of plasmids.

How?

Where to start? For some reason, I found (and still find) the concept of object-oriented programming very daunting. I also find Objective-C a very intimidating language, despite it being just a “thin layer” above ANSI C (or, to be more technical, a “strict superset of C” — thanks, Wikipedia). I think I understand the basic principles of it – you write a class which acts as a prototype for instances of that class (of which there may be one or more). Each instance combines data (in instance variables) and methods to access and manipulate that data.

Furthermore, there’s the Model-View-Controller (MVC) architecture to contend with. MVC (admittedly very sensibly) advises that the user interface code and data manipulating code should be separated with a controller in the middle to mediate communication between the two. MVC took me a while to get my head round, until I realised that it’s just like any web application. HTML, CSS and Javascript make up the View, server-side scripts comprise the Controller and the database is the Model. Somehow the client-server divide clears things up for me there…

Anyway, once I’d thought about these new concepts for a bit, I realised that I still had no idea how to actually implement them. For example, how do you actually make a class? Then how do you make an instance (or multiple instances) of that class and, most importantly, just how on earth do things work from then onwards? These are not small questions. I’ll answer a couple of these questions here, just in case a beginner (like me) stumbles across it and finds it useful:

How to make your own class

While it’s technically possible to create your own class from scratch, it’s much easier to leverage a great feature of OO programming called subclassing. Creating a subclass allows you to inherit the behaviour of the class that you’re subclassing (known as the superclass) and then add or modify that behaviour as you see fit. There are two very straightforward ways to create a subclass, depending upon which class you feel fits your needs best:

1. The first way (which can only be used when subclassing NSView, NSDocument or NSWindowController) is to go to File > New File… in XCode and select the appropriate subclass from the “Cocoa” section of the dialog. This will create both the .m and .h files in your project with very little fuss.

2. The second way is to head to Interface Builder and right-click on the class you want to subclass in the Nib-file window, as shown here:
Subclassing NSObject
When you select this, a new class, titled “MySuperClassName” appears in the column to the right of the superclass. Right-click on this class, choose “Create files for MyObject”, check the right files are going into the right XCode project and then click “Choose” on the sheet.

Once the files are in place, you can then add the appropriate method and protocol declarations in the .h file and the implementation of these in the .m file. The above methods of subclassing are really just a convenience feature — the real magic involves just sticking this in MYClassName.h:
@interface MYClassName : NSObject {
}

…where MYClassName is a subclass of NSObject. Simple as that.

How to “instantiate” (make an instance of) your class

My OO-beginner roots are about to shine through now; if I’m honest, I’m still not sure what happens at this point, so read on with caution… To actually create an instance of your class, you must use the common Objective-C alloc and init calls as follows:
classInstance = [[MYClassName alloc] init];
First of all, this allocates memory for the instance of MYClassName, initialises its instance variables and then allows this instance to be referred to using “classInstance,” where classInstance was declared at the beginning of the .m file as follows:
MYClassName * classInstance
So I can now pass messages to the instance like this: [classInstance setColor:[NSColor greenColor]], which might turn classInstance green, for example. There is another way to do this, which is to declare classInstance inline as type “id”, which allows the Objective-C runtime to determine which class classInstance is an instance of dynamically (if that made any sense). This would be done as follows:
id classInstance = [[MYClassName alloc] init];
with no need to define classInstance at the beginning of the source file. However, I don’t know whether or not this makes any sense for my purposes…

Rather importantly, there are all sorts of memory management shenanigans that come along with creating instances of objects. These shenanigans include releasing objects when you’re finished with them (or autoreleasing them), which in turn involves such delightful activities as reference counting. I have to say that, at the moment, the prospect of thinking about the “implications of nested Autorelease Pools” (see page 27 of the next link) is very scary indeed. If you do want to know more about memory management on Mac OS X, Apple has some comprehensive documentation here.

Does it actually do anything useful?

Not really, no, but I’m confident that my trusty circle-drawing program will eventually become a functional thing of beauty. Honest. Anyway, I’ve just realised how long this post has become, so I’ll stop here and save some of my exciting adventures through NSBezierPaths, Core Graphics and Quartz for another post…

Google Desktop for Mac

Google has just announced Google Desktop for Mac. Being from Google, it is in beta (even though the version number is, bizarrely, 1.0.0.155). Also, the Mac version certainly does not have feature parity with the Windows version. Notable features that are missing include the Sidebar, any Google Gadget support, advanced search, the ability to lock down searches and the “Floating Deskbar”. So it’s not really in same league as the Window’s version at this point in time. Perhaps the lack of “Gadget” support indicates that Google thinks Spotlight is crap, but Dashboard is pretty good, so didn’t bother competing on that front. Who knows?

So what does the whole thing do? Well, when you first download it, you’re actually downloading a 1 Mb installer (“Google Updater”) that doesn’t just want to install Google Desktop, but also tries it on with Google Earth, Google Notifier and, presumably, if I’d let it run its course, Picasa Uploader. I think this is particularly obnoxious behaviour from Google. The worst part is that I already have Google Earth installed but, because it’s in /Applications/Google/ rather than just /Applications/, Updater didn’t detect it and tried to download it again. At this point, I tried to quit the installer and was presented with this rather horrifying dialog:
Google Updater
So, let me get this straight. I have two options 1) Watch you (Google, that is) continue installing a program I already have or 2) Let you do it secretly. What a choice — it’s a tough one.

So after this pretty abysmal start, things picked up a little (aside from the ever-present Beta label and lack of feautres). After installation, I was presented with a rather helpful dialog, explaining that all I had to do to use Google Desktop was to press the command (⌘) key twice:
Google Desktop Welcome
After confirming that I had indeed “Got it!”, I was presented with the main head-up interface to Google Desktop, which is beautiful in its simplicity:
Main “head-up” interface
Pretty nice. Certainly as simple as the Spotlight interface. The Preferences link at the top right takes you to a pane in System Preferences — fair enough. It is, after all, a system-wide service and can run as a “faceless” process in the background. As you can see in the bottom right of the above image, Desktop was at the time hard at work indexing my hard drive (a process that took around an hour in my case for ~100,000 files). Rather nicely, it’s possible to perform a search while indexing is in progress, although obviously the results are incomplete…

At this point, I just waited until it had finished indexing before actually starting to use it. Once it had finished indexing, I ran a quick ps auxc | grep Google out of curiosity to see what was going on behind the scenes. To my surprise, this revealed 8 processes, as shown here:
Google processes
Now, I don’t actually know what all of these are doing, but there seems to be an almost comical level of redundancy between the processes. For example, what are all these doing: GoogleUpdateInstaller, Google Update Helper, GoogleUpdateDownloader and GoogleUpdateChecker? Weird. Also, what’s the difference between a Daemon and an Agent? Though I’m probably just being ignorant not knowing the answer to that one…

So far, so interesting. Now, in terms of features, the obvious comparison is between Google Desktop and Spotlight. On this front, Google Desktop looks fairly promising. My feeling (i.e. without any formal testing) is that Desktop is marginally faster than Spotlight (on my 17-inch MacBook Pro 2.33 GHz). It also has the option to present more information than the Spotlight menu does in the form of file-paths or “snippets” from mail messages, HTML files etc. However, Desktop does seem to ignore Spotlight’s preferences for the order in which search results appear (and presents no equivalent option in the preferences). When I search for “iPhoto”, for example, the first hit with Spotlight is iPhoto.app, whereas with Desktop, the first hit is the iPhoto Getting Started Guide — not really something I want to open on a regular basis.

Another feature of Desktop is its integration with your web browser. Once you’ve restarted Safari, you can access the Google Desktop homepage from a multiplicity of places: the Desktop menu bar item, its Dock icon or by heading to google.com and clicking on a new item above the search box: Desktop. All of these take you to 127.0.0.1:9115, which looks like this:
Google Desktop homepage
As you probably already know, this allows you to search for local content through the web browser. Through this interface, I’d say Desktop surpasses Spotlight in some regards, but not others. For example, it allows for searching of web history and will show you a small graphical preview of each page in the results. Also, cached email messages can be viewed within the browser with no need to switch to Mail, which is pretty nice. But Spotlight wins in terms of filtering down your results. Desktop gives you the option to show everything or just any of the following types: email, web history, files, media or “others”. Then it gives you the option to sort by either date or relevance and whether you would like a partial or exact match of the search term. These options are fairly limited compared with Spotlight, which presents the following options:
Spotlight interface
Desktop also allows for searching of Gmail accounts, which is neat (although it takes an age to index the messages) and, crucially, allows a Google search to be launched by pressing ⌘ ⌘ “Search term” Up-arrow Return. This can be done from any app and is definitely a bonus of installing Desktop, especially if you don’t already have Quicksilver configured to do something similar.

So all-in-all, Google Desktop is pretty average. It’s in beta (although admittedly I haven’t had any issues with it thus far), it doesn’t offer feature parity with the Window’s version, it isn’t better than Spotlight in all regards and the installer is horrible. But, on the plus side, it does offer a couple of nice new features, notably Gmail search, system-wide Google search and web history search with graphical previews. I’ll be leaving it installed for the moment, especially as it’s a pretty “passive” program — it runs in the background and hasn’t taken over any of my keyboard shortcuts, so why not? I think Spotlight in Leopard is introducing system-wide web searching, and Quick Look will give us rich graphical previews of every file but, for the moment, I think Google Desktop will make some contribution to my daily Mac-using life.