Access control lists on Mac OS X 10.4

Why use access control lists?
Access Control Lists (ACLs) were devised to replace the traditional POSIX permissions system which, by comparison, is fairly limited. The traditional POSIX system uses only 9 bits of data per file system object to define permissions (excluding the sticky bit and the set UID and set GID bits). The system is such that each file system object has three sets (technically classes) of permissions, applying to the 1) file’s owner, 2) the file’s owning group and 3) “everyone else” (by convention, the permissions are always displayed in that order). For each of these permission sets, the ability to read, write and/or execute may be set.

For example, a file with permissions rw−r−−r−− can be read and written by the owner (rw−), but only read by everyone else (r−−), whereas a file with permissions rwxr−x−−− can be read, written and executed by the owner (rwx), read and executed by other group members (r−x), but not accessed at all by other users (−−−). Such permissions are often expressed in 3 digit octal values where each digit represents a permission set (owner, group and other, in that order) and the number is calculated by adding 4 if the read bit is set, 2 if the write bit is set and 1 if the execute bit is set. So, for example, rwxr-xr-x would be represented by 755 in octal (4+2+1, 4+1, 4+1) and rwxr−−−−− would be represented by 740 in octal (4+2+1, 4, 0). More information on how POSIX permissions are implemented on OS X can be found here and here.

This system has been in place for many years on UNIX and is, considering its simplicity, quite powerful. However, in many situations, “workarounds” are necessary to achieve the desired result. For example, although a user can belong to more than one group (see the id command, specifically, id -Gn [username]), a file may only have one owner and one group assigned to it. Therefore, in the situation where two (or more) groups require access to a file, a new “quasi-group” must be created containing all members from both groups, and ownership of the file must be transferred to the new group using chgrp quasigroup foo.bar. This is clearly less than ideal as the new group doesn’t (necessarily) reflect an actual organisational unit, which is what the group attribute was originally designed to do. ACLs were introduced in order to overcome such limitations as well as provide much finer-grained control over file and directory permissions.

What are access control lists?
Apple implemented kernel-level support for ACLs in Mac OS X 10.4 “Tiger” to supplement the POSIX permission system. Apple’s implementation of ACLs is compatible with IEEE POSIX.1e draft 17 (2.0 MB gzipped PDF) which, despite being withdrawn by the IEEE, has been widely implemented and, although not an official standard, ACLs implemented to this draft standard are commonly referred to as “POSIX ACLs.” Apple’s ACL implementation is also compatible with that in Windows Server 2003 and Windows XP. However, not all file systems supported by Mac OS X support ACLs; only HFS+ supports them locally, while AFP and SMB/CIFS support ACLs over the network.

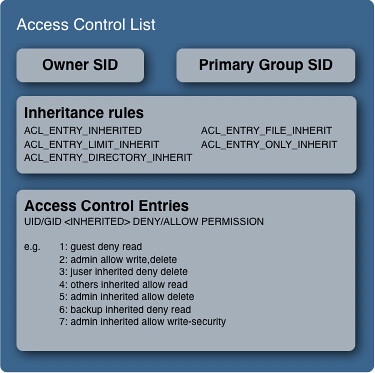
An ACL (which is always associated with a file system object by means of an extended attribute in HFS+) consists of a list of permissions in the form of so-called access control entries (ACEs). In turn, an ACE contains a set of permissions, whether those permissions are allowed or denied, the ID of the “trustee” to which the these permissions apply and rules of inheritance for the permissions. A trustee in this context may be either a user or a group. Note that under the ACL permission scheme, its possible for a group to be the owner of a file — a feat that is not possible under the POSIX system. Also, POSIX makes no provision for inheritance of permissions. While possible to recursively apply permissions to all subdirectories and enclosed items, it is, in Apple’s words, a “one-time operation”, i.e. any newly created files or folders in that file system branch would be created with the default permissions. Here’s a (simplified) view of exactly what’s contained in an ACL:

The granularity of control over file access is considerably greater with ACLs than with the POSIX system, as the following table of ACL access rights demonstrates (courtesy of the chmod man page and sys/acl.h):

Bit name Description
All file system objects:
delete (ACL_DELETE) Delete the item. Deletion may be granted by either this permission on an object or the delete_child right on the containing directory.
readattr (ACL_READ_ATTRIBUTES) Read an objects basic attributes. This is implicitly granted if the object can be looked up and not explicitly denied.
writeattr (ACL_WRITE_ATTRIBUTES) Write an object’s basic attributes.
readextattr (ACL_READ_EXTATTRIBUTES) Read extended attributes.
writeextattr (ACL_WRITE_EXTATTRIBUTES) Write extended attributes.
readsecurity (ACL_READ_SECURITY) Read an object’s extended security information (ACL).
writesecurity (ACL_WRITE_SECURITY) Write an object’s security information (ownership, mode, ACL).
chown (ACL_CHANGE_OWNER) Change an object’s ownership.
Directories only:
list (ACL_LIST_DIRECTORY) List entries.
search (ACL_SEARCH) Look up files by name.
add_file (ACL_ADD_FILE) Add a file.
add_subdirectory (ACL_ADD_SUBDIRECTORY) Add a subdirectory.
delete_child (ACL_DELETE_CHILD) Delete a contained object. See the file delete permission above.
Non-directory file system objects only:
read (ACL_READ_DATA) Open for reading.
write (ACL_WRITE_DATA) Open for writing.
append (ACL_APPEND_DATA) Open for writing, but in a fashion that only allows writes into areas of the file not previously written.
execute (ACL_EXECUTE) Execute the file as a script or program.

Activating and using access control lists on Mac OS X
It’s worth noting at this point that ACLs are in fact switched off by default in Mac OS X. In order to enable them, the fsaclctl program must be used as follows: sudo fsaclctl -p /mountpoint -e, obviously substituting in the appropriate mount point of the volume of interest. ACLs can be activated on all relevant volumes by issuing the command $sudo fsaclctl -a -e and similarly disabled by $sudo fsaclctl -a -d. Finally, the ACL status of a disk can be obtained by simply running sudo fsaclctl -p /mountpoint.

If ACLs have been enabled on the startup volume, a reboot (sudo shutdown -r now) of the system is required such that the change is registered by all applications. If the volume is not the startup disk, simply remounting the file system will suffice.

Once ACLs are activated, the tools used to read and modify them vary between the client and server versions of Mac OS X. On Mac OS X client (as of 10.4.8), there is no graphical interface for manipulating ACLs anywhere to be found and, as such, reading and writing permissions to ACLs must be accomplished through the command line programs ls and chmod, respectively. In Mac OS X Server, the Workgroup manager has been updated to include a rather nifty GUI for viewing or altering ACLs:

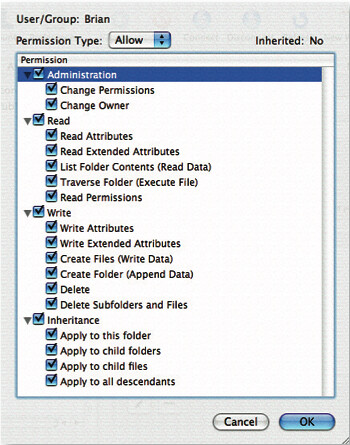
I think the GUI’s fairly self-explanatory, but what about on Mac OS X client? ls supports printing of all ACEs associated with a file by specifying the -e flag, which must be used in conjunction with the -l in order to see the list of ACEs. Actually setting and changing ACLs is a little more complicated (although not greatly so) and makes use of the chmod command, which is the tool originally designed for changing standard POSIX permissions. chmod‘s options for dealing with ACLs are: +a(#), -a, =a#, -E, -C, -i and -I. Here’s an example using chmod and ls -le to make a directory unsearchable to the “username” user:

$ mkdir nosearch
$ echo “Hello world” > nosearch/hideandseek.txt
$ ls -le
drwxr-xr-x   2 username group       68 Jan 12 14:28 nosearch
$ mdfind hideandseek.txt
/nosearch/hideandseek.txt
$ chmod +a “username deny search” nosearch
$ ls -le
$ drwxr-xr-x +   3 username group      102 Jan 12 14:36 nosearch
0: user:username deny search
$ mdfind hideandseek.txt
$

The most important command here is $ chmod +a “username deny search” nosearch, which shows the general syntax that must be used with chmod. Logically enough, to remove the same permission, one would have to type $ chmod a “username deny search” nosearch (notice the minus rather than plus before the a.) Access control entries can also be inserted at a specified point in the list by using the +a# flag thus: $ chmod +a# 2 “others deny read” filename to insert the others deny read ACE at position 2 in the ACL. Ordering ACLs isn’t crucial, but the canonical order is something along these lines: user deny, user allow, group deny and group allow. The man pages for ls and chmod have very detailed information on all of the options available in each tool.

One glaring question remains — how do access control lists and POSIX permissions work in an interoperable fashion on OS X? Basically, if ACLs are active on the file system hosting the requested file, OS X will look for the existence of an ACL for that file. If an ACL is found, the kernel evaluates it ACE by ACE until the requested permission is either allowed or denied. If the requested permission is neither allowed or denied or if an ACL is not found, the system falls back to the POSIX permissions system and evaluates those. A very thorough description of permission evaluation on OS X can be found here.

Summary
With the introduction of access control lists, Apple was really playing catch-up with other operating system vendors (notably Microsoft). But catch-up they certainly did – the ACL implementation on OS X is very thorough and, as Apple says, is “not bolted-on” but rather integrated from kernel level upwards, as one would hope. Although there is still no graphical interface for managing ACLs on OS X client, the need for ACLs on a single- (or few-) user system is considerably smaller than on a server and the addition of a UI would probably only add unnecessary confusion to the client OS. The importance of the introduction on OS X Server, however, cannot be underestimated even if only for the fact that OS groups and users may finally represent the actual organisation of groups and users in real life. This, along with the removal of the POSIX 16-group membership limit, the ability for permissions to be automatically inherited and the much finer-grained access control makes ACLs an extremely attractive option for system administrators.

Useful and esoteric CLI tools on Mac OS X (part 2)

As promised, here’s the second installment of interesting Mac OS X command line tools. See the first installment here. There’s quite a heavy focus on reading out information about the configuration of your computer, but plenty of other tools are detailed as well…

  • findsmb (find Server Message Block hosts)
  • This one definitely isn’t unique to Mac OS X, but can be very useful all the same. findsmb, located in /usr/bin/, is a perl script, which ships as part of the Samba suite. Called with no options, it runs a nmblookup ‘*’ and then feeds the output into a smbclient -L $netbiosname -I $ipaddress -N. The options basically mean: look up information for the machine with this (-L) netbiosname and this (-I) IP address (both are specified just in case the netbiosname doesn’t match up with the TCP/IP DNS host names) and don’t ask for a password (-N). The result looks something like this:

    Anonymous login successful
    Domain=[WORKGROUP] OS=[Unix] Server=[Samba 3.0.10]

    Sharename       Type      Comment
    ---------       ----      -------
    IPC$            IPC       IPC Service (My iMac)
    ADMIN$          IPC       IPC Service (My iMac)

    The first line of this output is reported by the findsmb script, along with the IP address and netbios name of every computer returned by nmblookup ‘*’. Potentially very useful.

  • sysctl
  • sysctl is a powerful tool introduced in 4.4BSD for viewing (and in some cases modifying) advanced system settings, including those relating to the TCP/IP stack, virtual memory and the CPU. It is an analogous to the proc file system on Linux. Running $sysctl -a | less shows a list of all the available properties, styled as a so-called Management Information Base (MIB) – the hierarchical dotted notation shown below. On my system, sysctl -a currently returns 384 values, including (as an example) the following information about current virtual memory usage:

    vm.shared_region_trace_level: 1
    vm.loadavg: 0.15 0.20 0.16
    vm.swapusage: total = 3072.00M used = 2304.75M free = 767.25M

    Incidentally, the same information can be obtained by running sysctl vm, which retrieves all values from the specified MIB domain.

    Individual values can also be obtained simply by specifying the MIB name, for example $sysctl -n machdep.cpu.brand_string returns the brand of CPU (the -n flag returns the value only, rather than the MIB-value pair):

    Intel(R) Core(TM)2 CPU T7600 @ 2.33GHz

    To set a value using sysctl, the -w option must be used, followed by a name=value pair. So, to blatantly copy an example from the man page, $sysctl -w kern.maxproc=1000 would set the maximum number of processes on the system to 1000 and $sysctl -w net.inet.ip.forwarding=1 would turn on IP forwarding.

    Bonus sysctl tip: $sysctl kern.boottime shows the time and date when the system was last booted, negating the need for any awkward calculations from the output of the uptime command.

  • hostinfo
  • This command takes no options and basically just performs a small subset of sysctl functionality in that it reports information about the current computer configuration. It can be thought of as a more detailed version of the “About This Mac” item in the Apple menu. The output is in the following format:

    Mach kernel version:
    Darwin Kernel Version 8.8.2: Thu Sep 28 20:43:26 PDT 2006; root:xnu-792.14.14.obj~1/RELEASE_I386
    Kernel configured for up to 2 processors.
    2 processors are physically available.
    2 processors are logically available.
    Processor type: i486 (Intel 80486)
    Processors active: 0 1
    Primary memory available: 2.00 gigabytes
    Default processor set: 86 tasks, 314 threads, 2 processors
    Load average: 0.20, Mach factor: 1.78

    Basically, this is the same as running $uname -v; sysctl hw.physicalcpu; sysctl hw.logicalcpu; machine; sysctl hw.activecpu; sysctl hw.physmem; top -l 1 | grep Proc; top -l 1 | grep Load;, but it’s a bit neater and, crucially, is much faster to type!

  • system_profiler
  • This one’s definitely unique to OS X and is the CLI equivalent of Apple’s GUI-based System Profiler (in /Applications/Utilities/). It replaced AppleSystemProfile as the CLI system-profiling tool of choice in Mac OS X 10.3 (I think). It doesn’t have many options, but the level of output detail can be varied (slightly) using the -detailLevel option followed by mini, basic or full. I’m not exactly sure whence all the information is gleaned, but I notice that it links to a private Apple framework called SPSupport.framework, which clearly has something to do with it…

    The only other interesting functionality in system_profiler is the ability to output all the information as an XML file ($system_profiler -xml), which can then be imported into the UI System Profiler for viewing.

  • osascript (Open Scripting Architecture script runner)
  • Another tool found only on Mac OS X, osascript allows for the execution of Applescripts from the command line. With the addition of Philip Aker’s brilliant OSAComponents, Perl, PHP, Python, Ruby, sh, and Tcl scripts are all placed at “peer level” with Applescript with the implication that they can also be run by osascript and indeed saved in .scpt files, .scptd bundles or even application bundles.

    osascript can run a script in three different ways, which are detailed in the man page: 1) read in line by line from stdin with one line per -e option 2) from a plain text or compiled script file or 3) “interactively” from stdin. Using either option 1 or 3, the script must be properly “escaped” using appropriately placed backslashes in order to get the script past the shell. The exact details are in the man page, but here’s an example of “interactive” input:

    $osascript < < EOF >tell application “iTunes”
    >play
    >end tell
    >EOF

    and exactly the same script, but using the -e option: $osascript -e ‘tell application “iTunes”‘ -e ‘play’ -e ‘end tell’

  • say
  • Useful for making shell scripts for visually-impaired people (or playing practical jokes over SSH), this little utility utilises the system-wide speech synthesis manager to convert text to speech. Simply $say Hello will speak the text “Hello” using the default voice set in System Preferences. Other voices can be specified using the -v option followed by a name of a voice (which are the same as the names in System Preferences).

    Input can also be from a text file, using the -f option followed by a file name and, more interestingly, the sounds can be output to an AIFF file using the -o option followed by a file name. As with osascript, say can be used in “interactive” mode by running it with no options. Text entered on stdin will then be spoken after every line return.

  • sips (scriptable image processing system)
  • This brilliant and powerful tool replicates the functionality found in the Image Events Applescript suite. In terms of editing, it allows images to be cropped, rotated, flipped, resampled and padded to a certain size. In addition, sips can change the format of an image to or from any of the following formats: jpeg, tiff, png, gif, jp2, pict, bmp, qtif, psd, sgi, tga. Finally, functions are also provided for reading and editing EXIF data and working with ICC profiles. As per usual, the man page goes into great detail about the various options, but here are a few select examples of how to use sips:

    • $sips -g all picture.png retrieves a selection of metadata from an image, including Spotlight attributes such as kMDItem­Acquisition­Model, kMDItem­ProfileName and kMDItem­ColorSpace. Strangely, mdls reports considerably more information, including attributes such as kMDItem­ExposureTime­Seconds and kMDItem­FocalLength.
    • $sips -r 90 picture.png rotates the image 90 degrees clockwise.
    • $sips -f vertical picture.png flips the image across its vertical axis.
    • $sips –setProperty format jpeg picture.png changes the image from whatever format it is currently in (in this case PNG) to a JPG.
    • $sips –setProperty copyright “Richard Pollock” picture.jpg sets the image “copyright” property to “Richard Pollock”.

    There are numerous other uses for sips, but I think the above is a reasonable summary of the most useful features.

  • screencapture
  • This is a CLI tool that exposes all of the standard OS X screenshot functionality. It can be used over SSH, in conjunction with SFTP or even Apache, as a kind of poor man’s VNC. Rather than having a user describe a problem over the phone or by IM, a quick $screencapture -m -tjpeg /Library/­WebServer/­Documents/­screenshot.jpg takes a screen capture of the main screen (-m) as a JPEG (-tjpeg) and saves it in the default Apache serving location, allowing the image to be accessed over the internet at http://111.121.131.141/screenshot.jpg, for example.

    As with the standard manifold command-shift-(control)-3/4 key combinations for taking screenshots,screencapture provides flags for interactive screen capture (-i or -iW for window selection mode), sending the image to the clipboard (-c) rather than a file, capturing the mouse cursor (-C) and turning off the camera sound (-x) for stealthily finding out the current user’s up to. A clever little tool indeed. screencapture, however, doesn’t allow for timed screenshots as found in Preview.app or Grab, but this functionality is easily replicated at the command line as follows: $sleep 5; screencapture -m screenshot.png &, which waits 5 seconds before taking a capture of the main screen.

  • softwareupdate
  • As the name suggests, this is the CLI equivalent of “Software Update…” in the Apple menu and offers similar functionality. It must, for obvious reasons, be run as root. $sudo softwareupdate -l will give a list of all available updates for the current system including, crucially, labels for all the updates which have no spaces in their names to negate the need for awkward escaping when using other flags with softwareupdate. These other flags include -d (to download all available updates), -i (to install all or, if a label is specified, a specific update) –ignore <label> to ignore certain updates and –reset-ignored which, as you might expect, makes all applicable updates visible again on the next use of $sudo softwareupdate -l.

So that sums up the second round-up of interesting CLI tools in OS X. I think in the next installment, I’ll take a look at some more developer-targeted tools like otool, lipo and launchctl

Useful and esoteric CLI tools on Mac OS X

Here’s a list of some command line tools in Mac OS X that range from the highly useful, through the quite interesting all the way to the slightly bizarre. A lot of them definitely aren’t specific to OS X, but I don’t have a Linux box to find out which ones those are. So, without further ado, and in no particular order:

  • mdls (metadata list)
  • This tool uses the Spotlight search APIs to query the metadata server (mds) for all of the metadata associated with a particular file. It takes a file or directory name as an argument and returns output as a series of key-value pairs, as follows:

    kMDItemAlbum = “By The Way”
    kMDItemAttributeChangeDate = 2006-11-24 11:58:17 +0000
    kMDItemAudioBitRate = 64
    kMDItemAudioChannelCount = 2
    kMDItemAudioEncodingApplication = “iTunes v3.0”
    kMDItemAudioSampleRate = 44100
    kMDItemAuthors = (“Red Hot Chili Peppers”)
    kMDItemContentCreationDate = 2003-04-29 07:37:16 +0100
    kMDItemContentModificationDate = 2003-04-29 07:37:16 +0100
    kMDItemContentType = “public.mp3”
    kMDItemContentTypeTree = (
    “public.mp3”,
    “public.audio”,
    “public.audiovisual-content”,
    “public.data”,
    “public.item”,
    “public.content”
    )

    The key for each value is a predefined metadata attribute. Spotlight makes provision for both generic attributes such as kMDItemFSCreationDate, but also for format-specific metadata as seen above with, for example, kMDItemAudioSampleRate. As a point of interest, the values that correspond to thekMDItemContentType and kMDItemContentTypeTree metadata attributes are Apple’s ingenious Uniform Type Identifiers, which go a long way toward potentially solving the manifold limitations of MIME types and file name extensions.

    mdls only has one CLI flag, -name, which allows a specific metadata attribute to be retrieved. For example, $mdls -name kMDItemTotalBitRate *.mp3 would show the bit rate of every file with the .mp3 extension in the current directory.

  • mdfind (metadata find)
  • The mdfind is the CLI equivalent of the Spotlight UI at the right of the menu bar. At its most basic level, a command such as $mdfind “Red Hot Chili Peppers” would return a list of all files on currently connected Spotlight-indexed volumes that contain the string “Red Hot Chili Peppers” anywhere in their metadata attributes or the Spotlight content index. Piping the output into wc -l neatly returns the number of hits.

    At a slightly more complex level, the string provided can be a raw Spotlight query, for example $mdfind “(kMDItemDurationSeconds > 600) && (kMDItemContentTypeTree == ‘public.audio’)”, which would return all audio files longer than 10 minutes on Spotlight-indexed volumes. mdfind has two options: the -live and -onlyin flags. -live doesn’t require any arguments and causes mdfind to run an initial search, returning the file paths of all matching items, but then continue running giving a tally of the total number of matches as files are created or modified (this leverages the functionality provided by the kernel through /dev/fsevents). -onlyin does exactly what it says on the tin, allowing the search to be restricted to a certain directory.

    Admittedly, the Spotlight attribute names are somewhat cryptic, but there’s a great guide to both the mdfind and mdls commands here, including the various logical operators that can be used to construct queries and even a Perl script that takes advantage of the mdfind command.

  • file
  • The file command is fairly powerful, although it is perhaps of limited utility (on Mac OS X) considering the availability of the aforementioned tools. It has many flags, but basically takes one argument, which is a file path. Once given this file path, it outputs information about the file type, gleaned from either filesystem tests, “magic number” tests or language tests (all of which are briefly explained in the man page). Here’s an excerpt of the output from running $file /* on my machine:

    /automount: directory
    /bin: directory
    /cores: sticky directory
    /dev: directory
    /etc: symbolic link to `private/etc’
    /mach: symbolic link to `/mach.sym’
    /mach.sym: Mach-O executable i386
    /mach_kernel: Mach-O universal binary with 2 architectures
    /mach_kernel (for architecture ppc): Mach-O executable ppc
    /mach_kernel (for architecture i386): Mach-O executable i386
    /private: directory
    /sbin: directory
    /tmp: symbolic link to `private/tmp’
    /usr: directory
    /var: symbolic link to `private/var’

    Nice.

  • lsof (list open files)
  • The manual page for lsof is vast, but basically it is, as the name implies, a tool that reports which files (including directories, device files and sockets) are currently open on the system. The extensive man page is due to the large number of options that can limit the scope of lsof to specific filesystem locations, process names, PIDs or UIDs. lsof, however, is probably most useful when piped into grep (or, if you’re a statistics junkie, wc -l).

    For example, a quick lsof | grep “/Volumes/Backup” reveals the culprits when you try to eject your backup disk only to find this error message presented to you:

  • fs_usage (file system usage)
  • Due to the kernel tracing facility that is used by fs_usage, it needs to be run as root under sudo. It’s primarily a debugging tool, reporting filesystem-related system calls and page faults in real time, but can also be useful in everyday situations. For example, it can be useful if a disk is “churning” and you want to know which process is causing all the activity; a simple $sudo fs_usage should reveal the offending process in that instance.

    Alternatively, $sudo fs_usage -f filesys PID will show all filesystem activity for a particular process or $sudo fs_usage -f filesys -e PID will show all filesystem activity except that for the specified PID (or PIDs). Might be useful to someone!

  • diskutil
  • Apple’s home grown CLI disk utility, named diskutil, utilises OS X’s Disk Management framework and therefore offers basically all of the functionality of the graphical Disk Utility found in /Applications/Utilities/. It’d be pointless to go through all the features of diskutil here when they’re so accurately and concisely described in the man page, but let it be said that they are very extensive, including RAID management, partitioning, secure erasing and much, much more.

  • iostat (Input/Output statistics)
  • iostat is common to all BSD systems and (I think) to Linux and Solaris boxes as well. In the words of the man page, it “displays kernel I/O statistics on terminal, device and cpu operations”. That pretty much sums it up, but a fairly good way of invoking it is $iostat -w X which outputs a line to stdout every X seconds or, for logging purposes, $iostat -w X >> iostat.out &. The output, since you’re interested, looks a bit like this:

             disk1           disk0       cpu
     KB/t tps  MB/s   KB/t tps  MB/s  us sy id
    169.90   1  0.10  20.88   3  0.06   7  3 90

  • ioreg (Input/Output registry)
  • Amit Singh’s book (ISBN: 0321278542) has a very informative paragraph on Mac OS X’s I/O registry (pages 1251-52). Basically, ioreg provides a way to traverse the various planes of the I/O registry (including the Power, Service, USB and FireWire planes) from the command line. It’s the CLI equivalent of IORegistry-Explorer.app, which is part of the developer tools.

    Much information can be gleaned from the IO registry, including visualising the downstream effects of shutting off power to a particular device (I haven’t done this, but Singh’s book asserts that it is possible). Personally, I think the most interesting statistics from ioreg are those regarding the batteries in laptops, some of which can be obtained by typing $ioreg -l | grep Capacity (obviously this will fail on a desktop machine)

  • pbcopy and pbpaste (Pasteboard copy and paste)
  • These are two brilliant little tools, especially useful for making ever-so-slightly more user-friendly shell scripts. The functionality is really in the name; whatever you pipe into pbcopy ends up on the system “pasteboard” and pbpaste will happily spit it back out again to stdout. So, for example, if you wanted to remove all the white space from some text on the clipboard (particularly useful if, like me, you work with a lot of biological sequence data) the following command would do the job: $pbpaste | tr -d ‘[:space:]’ | pbcopy*. Both pbcopy and pbpaste may take one option, -pboard, which may take general, ruler, find or font as its argument, depending on which system pasteboard is to be used. The “general” pasteboard is the default. I think that Apple’s inclusion of these tools in OS X is really great and makes for a nice bridge between the GUI and the CLI worlds.

    * Bonus tip: Because I use this feature so frequently, I set up an alias in Bash, as follows: $alias rmpbws=”pbpaste | tr -d ‘[:space:]’ | pbcopy; echo ‘Pasteboard white space removed.'”, so whenever I type rmpbws (remove pasteboard white space) at the Bash prompt, all white space is removed from the text currently on the pasteboard. Love it.

  • open
  • In a similar vein to the pbcopy and paste tools above, the open command provides a very pleasant bridge between CLI and GUI. According the man page, the command originally appeared in NeXTStep and I’m really glad it was carried over to OS X. The open command does exactly what you would expect (i.e. it opens the specified file in the default application as determined by LaunchServices), but it also provides some slightly unexpected features, as follows:

  • open http://en.wikipedia.org/wiki/Open_%28application%29 opens the Wikipedia page describing this command in the default web browser
  • open . opens the current working directory in the Finder
  • pbpaste | open -f opens the current contents of the system pasteboard in a new document in the current LaunchServices default text editor
  • ps auxc | awk {‘print $1 “\t” $2 “\t” $11’} | open -f opens a list containing the UID, PID and process name for all currently running processes in the LaunchServices default text editor (just as a slightly more fancy example)

So there we have a round-up of some CLI tricks and tools that may or may not make your life easier in Mac OS X. I’ll try to follow this up with some more great CLI tools this weekend…